Thursday, October 10, 2013

Crafter's Companion Blog Candy winner

Back in August, I won this wonderful stamp set from Crafter's Companion called Christmas with Barkley Let it Snow.

Here is the card that I made with it.

 
I heat embossed the entire image twice.  I colored both images using Distress Inks and then fussy cut Barkley from one copy.  The red background is a Spellbinder's Die.  I used a Spellbinder's oval die for the first image and mounted it on the red die cut.  The fussy cut Barkley was popped up on 3-D dots so that he stands away from the background.  I used Tulip Puffy paint to add the snow.  The snow flake background paper is from My Mind's Eye 6x6 Winter Wonderland Designer Cardstock Paper Pad.
It won't be long and this will have to go in the mail!

Wednesday, September 11, 2013

A Wedding Card

I was asked to make a card for a wedding reception that is being held a month after the wedding took place.  Here is my result.
This card is done in 3D so that the swans pop off the page.  I used a Cuttlebug folder (Kassie's Brocade) for the embossing and a Martha Stewart hearts punch for the band over the front.


Tuesday, August 20, 2013

Distressing without the stress these days

I am back again.  I made this card for my Mom using distress inks to color in the image.  I also used Distress Ink on the paper flower that adorns the front.

The edges of the card were distressed using Peeled Paint (one of my favorite colors).
 
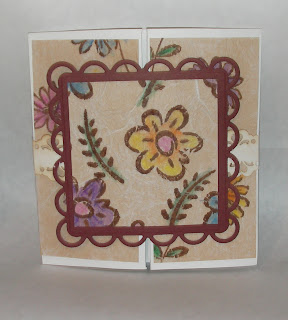
Here is the card with the flap opened.  I used a Spellbinder Die (Scalloped Ovals) to cut the openings.
 
And with the inner flap opened, you can see the inside of the card where I stamped my sentiment.
 
Now this card was inspired by Splitcoast Stampers, but I did not have the large dies that they use, so I used squares and rectangles and put it together that way.  I made a teabag medallion to put on the front.

Thanks for looking.  I hope you have a great day!


Thursday, June 13, 2013

Of Die cuts and flowers

I wanted to share another card I have made.  This one used a different way to use Spellbinders die cuts.  For this card, I used Contemporary Hearts, and Parisian Accents and Foliage.  I also used a punch for the pine bough leaves and some paper flowers that I colored using Distress Inks.

The centers of the flowers and the 3 little gems on the top right of the card are actually "pearls" but don't show up so well in this photo.
 
When the card is open, it looks like this on the inside.
 
Here you can see the pearls better.  And you can see that inside there is another die cut that does not show when the card is closed.
 
I am entering this card in the following challenge:


Thursday, May 30, 2013

Origami Dresses

I found a video online for folding origami dresses.  Once I started, I just could not stop!  I kept finding more little bits of paper that I thought would make a cute dress.  In the end, I had 30+ dresses!  I am working on getting them onto cards now.

On this one, the largest dress is 1 1/4" tall.  Using a rubber stamp, I created the clothesline poles.  Then I masked them and using my Distress Inks, I made the background.
This one I made by masking the circle before I shaded with my distress inks.
 
And this one was made adding a digital sentiment that I had.

 
I hope you enjoyed seeing my latest endeavors.  Be warned - these can be very addicting.  I just wish I could make ones that would fit me as easily.  They are so easy to make.


Tuesday, May 7, 2013

Spring colors

Today I have another challenge card made for the Spring Colors challenge #158 at Robyn's Fetish Challenge Blog.
The image is a Digital Stamp from Robyn's Fetish Digital Stamps and More called Birdie's Nest.  I colored the image with colored pencils and did the blue background with chalk.  The sentiment comes from Create with TLC and I cut it out using Spellbinders Big Scalloped ovals.

I do hope spring has really arrived here in northern Wisconsin!


Friday, May 3, 2013

The Chef

I won this digital stamp from a blog hop at ROBYN’S FETISH CHALLENGE BLOG.

Here is the card I made with my digi!
The background paper and Sentiment I received from Paulette's blog at Create with TLC.  The card stock is from Walmart - made by Colorbok.
 
I colored the image using Crayola colored pencils.  The sentiment is highlighted using Vintage Photo Distress Ink.  I cut some peel-off flowers in half to form the border around the spoon background paper.
 
Have a great day!


Thursday, April 11, 2013

Flowers Box card

Good morning from another snowy day in northern Wisconsin!

I wanted to share a box card I recently made.  This is the card closed.
The background is made with white tissue paper on tan card stock.  I then stamped the flowers with Vintage Photo Distress Ink and colored them in with water color pencils and blended with water.  This card is held closed with a punched border strip that has small pieces of Velcro on the back.
 
When the card is opened, the box is revealed!
I used punched circles to create the birds and their wings are made with stamped flower parts cut out and attached to the back of the birds.  The fence is made using a Martha Stewart border punch and then scored on my Martha Stewart score board.  Using my Cuttlebug and a die, I punched the sentiment from a paint chip.  I finished it off by adding some flowers that I received from a new friend.

I am entering this card in the Simon Says Stamp Challenge APRIL SHOWERS AND/OR SPRING FLOWERS

 I wonder if SNOW showers would have qualified...?


Friday, March 22, 2013

Stamping and Watercolors

I made this card yesterday - along with 5 others like it.  Easy to do assembly line style and makes up a quick set of note cards.
The background is made using Distress Inks and the background stamp is done by stamping off first and then stamping the card.  After letting it dry thoroughly, the 3 flowers are stamped with Versa Mark and then embossed in white.  The flowers were then water colored.

Using the same technique, I made these too.

This is a fast, fun, easy technique.

I would like to enter this card in the following challenge The Robyn’s Fetish challenge # 152 – Must use Green


Wednesday, March 20, 2013

First Day of Spring

Today is the first day of Spring, but here in northern Wisconsin, I think Mother Nature has forgotten us.  I woke up to 3 degrees but sunny.

I have been working on a few new cards and here is one of them.
I love this little gal on the trike and she looks like she is on a great journey.

This is a card I made for a Bunny Hop swap.  Don't you just love this little bunny?
 
Both of these images were colored with colored pencils.
 
I hope it is warm where you are.  I am sure Spring can't be more than a month away...


Thursday, January 24, 2013

Newest Cards

I was hoping to be able to post once a week starting at the first of the New Year, but time has a way of getting away from me and already I am behind.

But, here are some of the latest cards I have made:

This one is called a double zig-zag card and I just love how easily it goes together.  The hardest part is deciding how to decorate it.
 
This is the card with the belly band on to help hold it closed.

Take the band off, and it opens up.  There is another flap on the inside and it lifts up.

Opened up, it reveals the sentiment.
 
And here are a couple more that I have made:


The sentiments shown came from Create with TLC.
 
The instructions for how to make this card can be found on this blog:
 
Here is another card I made for a challenge that required the use of a digi image of my choice from her store, blue, snowflake, snow, and twine.  I did meet the requirements and I am pleased with my result.

I hope you enjoy these cards and that they inspire you to be creative.  Stay warm!